In present days, all the recruitment process like IBPS, GATE, JEE Main, JEE Advanced, SSC, UPSC, GPSC, TET etc becomes online. All the organizations or institutes are inviting online application from aspirants. The major problem arises during the online application is to resize scanned photos required to upload during online application.
All the organizations have their own rules for uploading images, some required 20Kb and some required less than 100Kb, but it’s difficult for the aspirants who don’t have enough computer knowledge and can’t able resize scanned photos like the recent photograph and signature.
There are also some organizations which required the specific image format too like .jpg, .jpeg or .png etc. If you have the image file with other extension and in the application form it required .jpg than also difficult for aspirants but you can resize and also change file extension with simple steps given here.
Follow these step-by-step instructions to Resize Scanned Photos
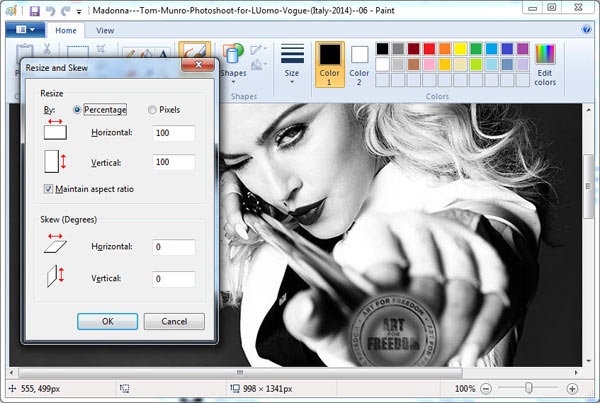
Aspirants can resize scanned photos by the help of free tool available inside your Windows operating system. Check out the steps how you can resize scanned photos and change file extension with the help of Windows Paint.

- Scan your photograph and signature and save it on your hard drive.
- Now select one image and right click on and select option Open with Paint.
- The selected image will open in Microsoft Paint.
- Now press Ctrl+W together from your keyboard and a new window will open inside the paint editor.
- Here you can resize your photo either by percentage or by pixels.
- If you the notification not provided any pixels ration than resizing with Percentage is the best option either choose Pixels option.
- Now change the value of Horizontal box and the value of Vertical box will automatically change as per escape ratio.
- Click on the OK button and you will find the smaller image.
- Choose Save As option from the menu if you want to change the extension of your scanned image which is required as per application form else simply save it.
- Repeat process until you get your desired file size. That’s it.
Here we talk about the native tool inside the Microsoft Windows but there are some online tools available by which you can to resize scanned photos and also change the file extension of scanned photos. Check out the some tools widely available free online.
Convert And Resize an Image by Gary stood
In this online tool, you just have to upload the image which you want to resize and change the format. Check out the step by step tutorial.

- Visit the online image converter tool from this link.
- Upload your scanned photo that you want to change the file format and resize the scanned photo.
- Now Select width and Height and then select file Format.
- Now click on Send File button.
- The download link will appear on your screen with your desired size and file format.
- Download it on your hard drive for future use.
Resize an Image by WebResizer
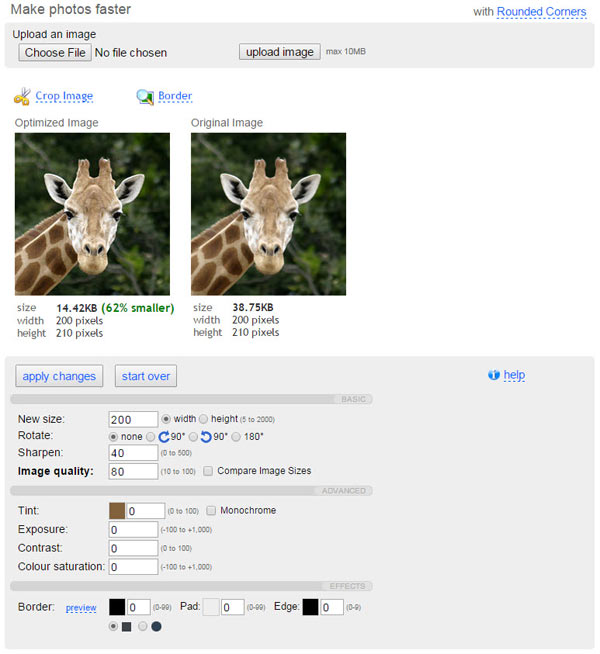
This is another best tool to resize your scanned photos. It will only resize your photos so this tool can only make your photo smaller with good quality.

- Visit the webresizer website from this link.
- Upload your photo from the choose file field and hit upload image button.
- Now you will see optimized image and the image you uploaded on screen.
- If the optimized image file size is that you want then download it from the link provided below image else change the size, image quality and sharpen field and then click on apply changes button. That’s it.
Here we talk about some free tools but you can also resize scanned photos with the help of Adobe Photoshop which is a paid software. If you found any difficulties regarding how to resize scanned photos, don’t hesitate to write us from the below comment form. We will try to help you as fast as possible.

THANK YOU FOR YOUR KIND HELP IN IMAGE EDITING…..ITS WORKING
I always do it with photoshop. But your instruction seems easier and faster.
Thanks.
i tried it but while zooming the converted pic its unclear!
suggest me plis